Ecu serialovertcp
Subpage of ECU Communication Dialog Overview
ECU Communication over TCP - Table Of Contents
What good is it?
Set up and start the server
Setting up the connection on the client side
What good is it?
With a serial-tcp bridge you can connect to a remote ECU over TCP. On the remote computer there must a server run which will send the incoming data from the ECU to the TCP socket and vice versa.Read the next section to see how to setup a tcp-serial bridge.
Please read also the information on our Wiki.
Set up and start the server
On Linux we recommend the ser2net utility. You can download and install it with your package manager. If you want to compile it, the source code is available on the SourceForge. You may also try to compile it under Cygwin.Under Windows these are the recommended programs:
- VemsTCPSerialBridge - developed by us. Download
- or serproxy - developed by Stefano Busti. This program is bundled with VemsTune (it has a GPL license), you can find it in the 3rdparty directory.
ser2net and serproxy are command line programs, VemsTCPSerialBridge has a GUI to configure the settings.
Configuring and starting ser2net
- Open /etc/ser2net.conf to edit
- You need the following:
- an open port to listen on (receiving incoming connection): tcpport
- timeout in seconds: timeout. Timeout means the duration after that the port will be disconnected it there is no activity. Use 0 value to disable this feature.
- the communication port which the ECU is connected to (e.g. /dev/ttyS0 or /dev/ttyUSB0): comport
- the baudrate: br
- Add the settings to the end of the config file in the following format:
tcpport:raw:timeout:comport:br
For example: if the ECU is connected on COM1 = /dev/ttyS0 with 19200 baudrate and 1000 ms timeout, and you want to use the 4400 TCP port for communication, you may add this line:
4400:raw:1:/dev/ttyS0:19200
- You may add extra config parameters, please read the documentation in the config file
- That's all, save the config file and you may start the server now with the ./ser2net command
Configuring and starting serproxy
- Open the config file (VemsTune directory\3rdparty\serproxy.cfg) with a text editor.
- You need the following:
- an open port to listen on (receiving incoming connection): tcpport
- timeout in seconds: timeout Timeout means the duration after that the port will be disconnected it there is no activity.
- the communication port which the ECU is connected to: comport (e.g. in case of COM5, comport will be '5')
- the baudrate: br
- Find the comm_ports= and set it to the com port number: comm_ports=<comport>
- Set the baudrate: comm_baud=<br>
- Set the timeout: timeout=<timeout>
- Set the communication port: net_port<comport>=<tcpport>
- If you do not find one of these settings, just add it to the end of the file
- Save the file and exit editor
A sample config file may look like this: (ECU is connected on COM5, 19200 baudrate. TCP port is 4242)
	# Sample config file for serproxy
	# See serproxy's README file for documentation

	# Transform newlines coming from the serial port into nils
	# true (e.g. if using Flash) or false
	newlines_to_nils=true

	# Comm ports used (we use only the COM5)
	comm_ports=5

	# Default settings
	comm_baud=19200
	comm_databits=8
	comm_stopbits=1
	comm_parity=none

	# Idle time out in seconds
	timeout=300

	# Default this line is not in the config file, so we added it
	net_port5=4242
Now you can start the server: serproxy.exe
Configuring and starting VemsTCPSerialBridge
>>>Setting up the connection on the client side
To connect to a remote ECU you should set up the IP and the port of the remote computer that the ECU is connected to. You can do this on the Preferences/ECU Communication Dialog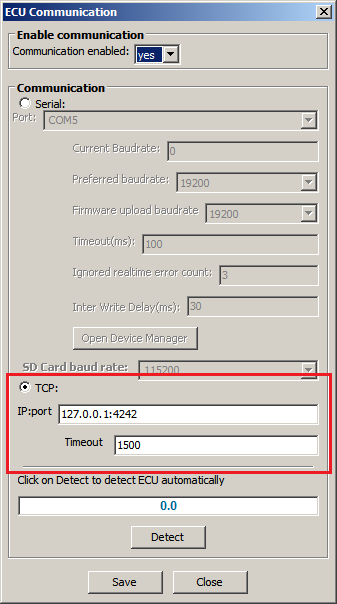
- Enable communication
- Select TCP radio button
- Enter the IP and the port of the remote computer in IP:port format (eg. 127.0.0.1:4242)
- If you experience timeout problems, increase the value in the Timeout textbox (usually 1000-1500 should be great enough)
- Click on Save, and the VemsTune will try to connect to the remote ECU