Subpage of Tools menu
Analyze/record trigger log
Table Of Contents
What is this?
The trigger log screen
Buttons and controls
Navigating with keyboard
Show result
Change settings
What is this?
Triggerlog is mostly used to analyze input triggers during cranking. Use higher baudrate for idle and higher RPM, especially important with 60-2 trigger (low baudrate can be misleading: some teeth might appear missing).
- Analyze a previously saved trigger log (offline mode)
- Click on Tools > Analyze/record trigger log, click on Log File and select a trigger og to load
- Record and analyze trigger log live: connect ECU, click on Start V3 (online mode)
- Or drop the trigger log file on the VemsTune main window
Note: in offline mode Start V3 and Stop V3 buttons are disabled and Pause and Scroll as real-time buttons do nothing when you click on them
In online mode triggerlog files will be created in the current working directory. Each time you click on Start V3 a new trigger logfile will be created
The trigger log screen
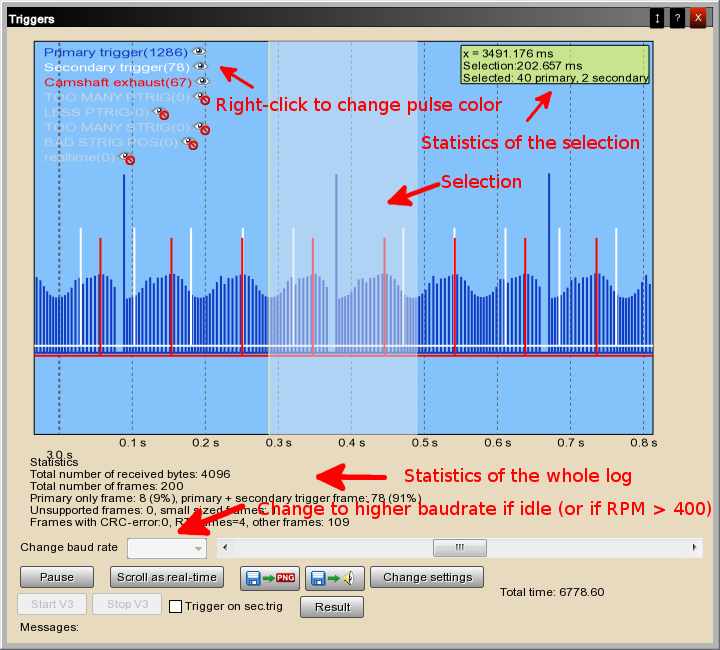
Triggers appear almost like on an oscilloscope - but pulse heights are related to time gaps, NOT the signal amplitude.
Trigger pulses are represented by color vertical lines.
If you move the mouse on the screen, or select an area, the current position or/and the length of the selection will be displayed.
Also the number of primary and secondary triggers in the selection is displayed.
The theme (colors of the screen, triggers) and the vertical offsets of the triggers can be changed, see Change settings section.
The buttons in the right-top corner (left-to right):
Under the scope-screen there are some data gained from the triggerlog.
See also the next section to read about the buttons.

- Pause: in online mode you can pause/resume the continuous display of the triggers. The incoming triggers are registered but not displayed. Press Pause again to display the incoming triggers. In offline mode, this button has no effect
- Scroll as real-time: in online mode if you zoom into an aream, or navigate with the cursor, this area will be displayed on the scope however there may be incoming triggers. Press this button to show the new triggers rather than the selected area. In offline mode, this button has no effect.
- Save to PNG: save the scope screen to PNG file
- Save to audio: export primary and secondary triggers to WAV or RAW audio file
- Change settings: see settings section
- Start V3: set status for waiting for incoming triggers from V3. This button is enabled only in online mode.
- Stop V3: stop waiting for incoming triggers. See also Pause button! This button is enabled only in online mode.
- Trigger on sec.trig checkbox: if it is checked, the position of the secondary trigger is fixed. All other triggers are aligned to the last secondary trigger
- Result: Show result
Navigating with keyboard
The yellow vertical line on the scope is the cursor. You can move it by clickin on the screen or with keyboard.
Note: with mouse you can not select bigger area than as shown on the scope. To do this, you need use the arrows
| Key | Action |
|---|---|
| Up / Down | Zoom in/zoom out |
| + / - | Zoom in/zoom out |
| Mouse wheel | Zoom in/zoom out |
| Left / right | Move cursor left/right |
| J / K | Move cursor left/right |
| Ctrl + Left / right | Navigate left/right - small steps ("with the half of the screen") |
| Ctrl + J / K | Navigate left/right - small steps ("with the half of the screen") |
| PgUp/PgDown | Navigate left/right - big steps ("with the whole screen") |
| H / L | Navigate left/right - big steps ("with the whole screen") |
| Shift + Left / right | Select an area |
| Shift + J / K | Select an area |
| Enter | Zoom selection |
| Backspace | Zoom back to previous level. |
| Space | Center cursor (if possible) |
| F1 | Show/hide quick help |
| F2 | Advanced help |
| F5 | Set a 720deg cycle length on selection |
| F6 | Unset the 720deg cycle length |
Show result
You can display the triggers (only primary and secondary triggers) in a table format by clicking on the Result button.
A sample result with only primary triggers, m582 trigger type. (Missingtooth, N-2)
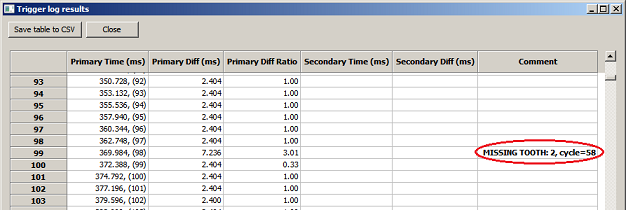
The table can be exported to CSV file which can be opened by any spreadsheet
Change settings
On the settings dialog you can change
- the color of the background and the scope
- the color of the texts and each trigger type
- the vertical offset of a trigger (it prevents to draw triggers on each other)
- Save & close - the settings will be applied and saved to file, and the dialog will be closed
- Apply & close - the settings will be applied and the dialog will be closed without saving the settings
- Cancel - close dialog without any modification
- Default values - Restore colors and offset values to pre-defined settings