Subpage of MembersPage/MarcellGal/PowerAndTraction
- In the car we purchased, everything related to air conditioner was missing from the engine bay
- the parts in the cabin were there
- the system was washed
- we got a new AC compressor and condenser, and drying filter mounted
- while the MembersPage/MarcellGal/PowerAndTraction/CompressorChargeCooler is mounted at the front, the condenser is mounted at the left side of the engine, in front of the main radiator
- got it filled with R134a gas, it seems to work
- but they only made the pressure part of the AC. We have to complete the fan and clutch electric circuit (see below)
- they haven't cleaned the airpaths either (zzz). Can be done later with a little extra hassle
- relay 2 was there (now used), but relay 6 and relay 11 were NOT. This raises suspicion about the integrity of the AC control head. There is also a home-mounted switch on the control head that suggests they used it in manual mode.
With the [schematics] and [SJM page] (see the 0.2 + 0.2 Ohm resistor pack at 85% of the page, mounted under the main radiator on the main console) it is possible to identify/verify the relays that switch on the radiator cooling fan in different power-stage (3 stage system: 0.4, 0.2 or 0 Ohm series resistor).
A/C Control
We have a universal pressure-switch in the high-pressure tube (after compressor), with 2 blue, and 2 black-green wires:
- Normalpressure ( blackgreen - blackgreen ) : closed between 2.5 and 28bar. Suitable to enable the relay that enables clutch, and turns the radiator fan (which also draws air through the AC condenser) at low fan-speed
- Above18bar (blue-blue): "high-pressure switch" closed above 18 bar: Suitable to turn the radiator fan on at high power through a 70A relay
NOTE: now, after they filled the system with R134A gas (with engine off),
- blue-blue is normally inf Ohm
- blackgreen-blackgreen is normally 0 Ohm
Clutch control
- we plan to avoid the highly advanced automatic A/C control that is built into this car: many things can brake, it does not worth to debug
- the ECU can use a miscoutput to
- disable compressor at max TPS (or whatever condition the user finds appropriate, eg. also at low TPS for cars without idle-valve)
- disable compressor during cranking
- TODO: after disabled, do NOT enable for 20 seconds (to prevent compressor clutch wear and belt abuse)
AC main 30A relay
- the output of this relay switches on
- the AC compressor clutch (needs +12V)
- Optionally it can also switch on a small "raise-idle" solenoid (normally not needed when there is an IAC valve)
- when ignition is on and the AC manual switch is on, the 30A relay control winding gets +12V
- the other pin of the relay control winding gets GND when both the ECU and the pressure range allows:
- when ECU allows AC, it pulls the blue wire to ground
- when the universal pressure switch senses pressure in range 2.5 .. 28bar, the blue-pair is closed so the relay can turn on (if VEMS ECU also allows, see above)
Radiator fan (on low-power) relay, or a 2nd circuit of the above relay
- original plan was to switch radiator and AC clutch by same 1 circuit relay (the AC main 30A relay). However the AC clutch +12V control line MUST NOT be directly connected to the fan (low-power point in the fan resistor pack):
- When the fan turns on for some other reason (coolant temperature too high), we do NOT want the AC clutch to turn on !!! => separate relay (output) needed
- the output of this relay (circuit) is the radiator fan at partial power (appr 20A current) through a 2x 0.2 Ohm series resistor that I found under the coolant radiator
Fan stage2 relay. DONE, reused factory relay
- when ignition is on, the 70A relay control winding gets +12V
- the black-green pair switches on the 70A relay by pulling other end of the winding to GND. The switched circuit powers the main radiator fan to stage 2, with only 1 x 0.2 Ohm series resistor
- I found that the schematic was very precise about this. I pulled relay 2 and measured the wire to identify the connector of the high-pressure switch. The connector was hanging where one expects (near the compressor). I shorted the terminals of the connector, and the fan came on in stage 2 (pretty loud).
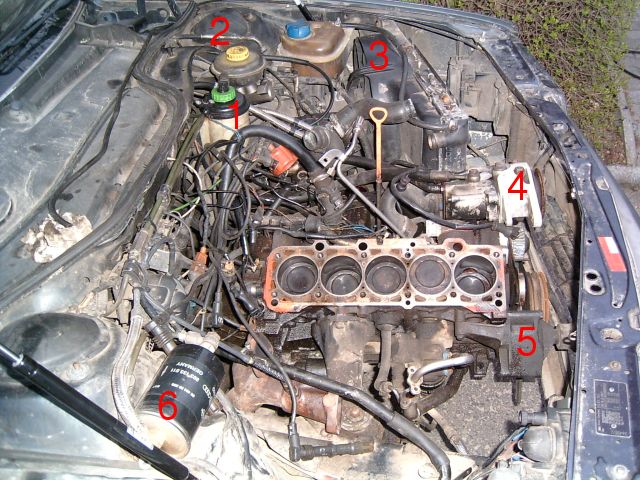
Clearance

- 1 hydraulic fluid container (central hydraulics fluid reservoir) for steering and brakes
- 2 break cylinders and break fluid tank (also for clutch)
- 3 main radiator for engine coolant
- there seem to be enough space in front of it for the air conditioner cooler. In fact, with the charge cooler's space requirement, I cannot imagine any other mounting position for the air conditioner radiator
- 4 mounting flange for belt driven "Central hydraulics pump"
- It looks like power steering and breaks
- 5 "front engine mount" (is that the proper name?)
- also serves as the mounting flange for the alternator
- The charge cooler has to be fitted either below or above the frame mounted part of the torque stop => seriously limits the max size charge cooler that can be fitted
- It's very common that a tuner removes the front engine torque absorber...once. Then they get tired of snapped and torn hoses (oops) and put it back in again.
- The torque stop can usually be modified a bit to give 10-20mm more clearance above the cradle. That also limits the movement of the engine and makes the car feel better (in Jorgen's opinion).
- 6 Fuel filter
Links
- http://members.aol.com/c1j1miller/repair.html many repair instructions, engine and body
- [Babelfish translation of the Selbst-Doku wiki AC page]
- http://www.2bennett.com/body_audi_200_intercooler.html
- ...